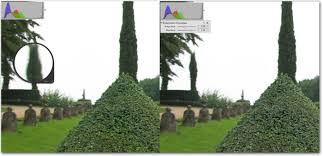
You may have heard of this phenomenon in connection with shooting trees against a bright grey sky where the lens has caused a purple fringing between the branches and the sky. This is called Chromatic Aberration (CA) and it is unfortunately a fairly common occurrence with many lenses. The fringing isn’t always purple but this is the most common manifestation. It is occurs when the lens cannot bring all the different light wavelengths together to reach the sensor correctly.
Depending on the severity of the CA, it may only become obvious when you zoom in to 100% or more. It can occur with any lens but probably mostly with budget lenses. If there are compromises in the design of a lens, then in certain conditions some CA will become apparent despite the price. Zoom lenses are often the worst examples due to their complex design.
If you have Adobe Photoshop, Lightroom or Camera Raw you may have already used the tools to fix this. In most cases, you simply choose the appropriate colour slider and the problem can be alleviated. Likewise certain camera manufacturers own software can cure it and indeed more and more ‘in camera’ processing automatically compensates for it.
If, having pointed this CA out, you find that some of your images now or in the future display it then the following should help you reduce its effects.
CA is the sort of thing that can really make a printed photo look poor and competition judges will jump on it.
In Photoshop Elements you can quickly and easily remove CA.
Open the image
Start a new Hue/Saturation adjustment layer as follows:
from the menu pull downs
Layer
– New Adjustment Layer
– Hue/Saturation
Give the layer a name and click ok.
Now you will have the Hue/Saturation dialog box come up.
It defaults to the Master Control, leave this alone.
Click the pull down menu (Currently it says “Master”)
select “Magenta”
Slide the Saturation control slowly to the Left and the purple fringe will begin to vanish. The amount needed is commonly in the range -60 to -90 but adjust it for your particular image needs.
If when you have carried out the suggestion above you now have a Cyan (greenish) fringe, try the following:.
Select the pull down menu again and select Cyan.
As before, drag the Saturation control slowly to the Left until the Cyan fringe has decreased.
When you are satisfied that your changes are as far as you can go, click ok on the dialog box. Your CA has now been reduced as far as possible.
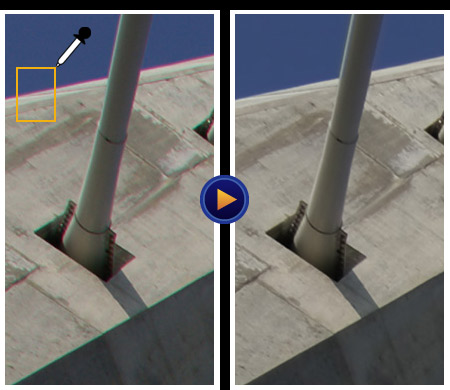
In Lightroom a similar colour adjusting process applies. Lightroom 5 and later versions are great at removing these colour fringes.
The first thing to do is open the image in the Develop Module.
Scroll down the right hand Panel list to find the Lens Corrections tab. Tick the box labelled “Remove Chromatic Aberration” and view the result.
You should find that it has made a difference but it sometimes it doesn’t fix the problem entirely. The cause may be because the CA is showing up in a strange blue colour and the Lightroom auto-fix settings tend to work better on green and purple fringing. What is needed are some other more precise colour adjustments to see if it can be eliminated it altogether.
Click on the Colour tab under Lens Corrections and you will find Defringe options. You can run two defringe operations at a time, one based around purple, the other around green. You can widen your spectrum or move it around if your colour fringing doesn’t fall within those common colours.
If your CA is resembles an aqua blue, start on the Green Hue slider. Raise the amount about halfway then widen the Green Hue sliders until the blue fringe is gone.
View your image at around at 100% magnification and check the brightest areas. You may notice some purple fringing.
Raise the top Amount slider and it should make a change but widening out towards blue can eradicate it.
In the full version of Photoshop’s Camera RAW interface there are two sliders to help remove fringes. There are two sliders, Fix Red/Cyan Fringe and Fix Blue/Yellow Fringe. They work by rescaling the colour channels in the image. By using one or another or both, you can adjust them and the fringe will decrease or disappear.
You can experiment by first using the Fix Blue Fringe slider to reduce the blue and the the Fix Red/Cyan to reduce the rest.
The options in the Defringe drop-down menu (default is Off) are:
All Edges – de-saturate colour along any edge where there is a sudden change of colour. This can introduce some of its own fringes.
Highlight Edges – defringe edges where there is a significant change in contrast.