BROMSGROVE PHOTOGRAPHIC SOCIETY
Technical guidelines for preparing files to be entered into
BPS Projected Digital Image (PDI) Competitions
These guidelines cover the following software:
Photoshop Elements
Photoshop Full version
Photoshop Lightroom
1 Introduction
1.1 It is essential for the smooth running of the competition that members comply with the following requirements. These should be read in conjunction with the BPS Competition rules which can be found inside “Information” on the BPS web site.
1.2 These requirements may be altered at the discretion of the BPS Committee.
2 Input Requirements
2.1 IMAGE RESOLUTION – All photographic files must be in JPEG format with minimum compression and shall be a maximum of 1600 pixels wide and a maximum of 1200 pixels high.
Neither of these dimensions should be exceeded and they remain the same for both landscape and portrait formats..
2.2 COLOUR MODE and SPACE – The colour mode should be RGB and the colour profile should be set to sRGB.
2.3 FILE NAME –
The BPS Competition rules state the following:
- File names must be in the format [Projection order] [single space] [Title].jpg e.g. ‘2 My Photo.jpg’ or ‘3 A Duck.jpg’ no dashes, underscores etc. between the number and your title please. Use capital letters and spaces in the title where they would normally appear and do not type ‘.jpg’ after the title (as .jpg is inserted automatically by the software). Files should be submitted in relevant folders entitled ‘Mono’, ‘Colour’ or ‘Nature’.
2.4 FILE FORMAT – Use maximum quality JPEG only.
2.5 INPUT MEDIA –
The BPS Competition rules state the following:
- Entries may be made on any suitable medium, including by email to the Competition Secretary. In the case of email, the Competition Secretary will always send a receipt stating the number of readable files received. Files will be deleted from the computer after a competition if the entrant so requires.
The following pages cover sizing your image and setting its colour profile
There is a variety of image editing software available. Guidance here is only given for the Adobe range. We will be adding other software and hope that users will be able to adapt this information in conjunction with their Help menu. The instructions and pictures below are from a Windows system. Mac users should be able to adjust them where necessary.
3.1 Using Photoshop Elements Editor (normally just referred to as Elements)
The version used here was 10.0 but other versions should work in a similar way.
3.1.1 Re-size the Image
Make a copy of your image file and work on the copy so that you do not inadvertently overwrite the original. On the menu bar, under Image, go to Resize then click on Image Size.
Tick the ‘Resample’ and ‘Constrain Proportions’ boxes. Ignore the ‘Document Size’ box.
In the ‘Pixel Dimensions‘ box to the far right of ‘Width’ and ‘Height’ ensure that the word ‘Pixels’ appears. If it does not, then use the dropdown arrow to change it to Pixels.
To the right of ‘Width’ enter 1600. The number of pixels in ‘Height’ will then change to maintain the aspect ratio. If this number (Height) exceeds 1600, then enter 1200 into the Height box and the number of pixels in Width will reduce to maintain the aspect ratio.
Be careful to check that the specified maximum dimensions are not exceeded especially for nearly square formats. Click on the OK box and the image will be resized.
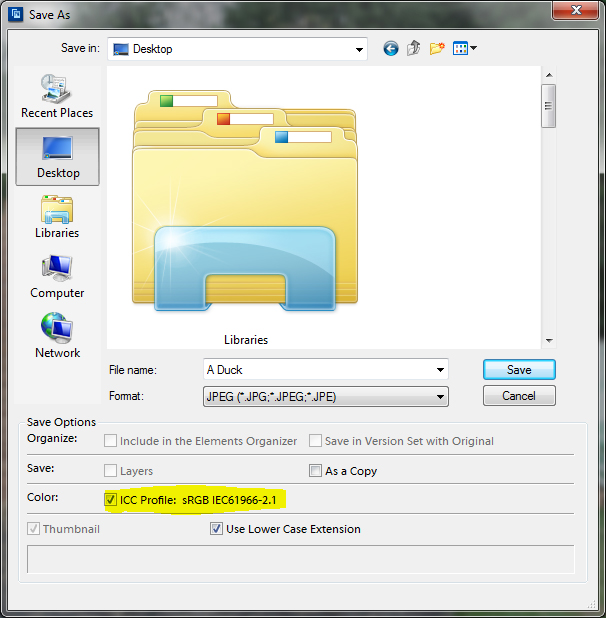
3.1.2 Set the file’s name and extension
On the menu bar, under File, click on Save As and you will see the picture below (or similar).
The name of the file should be formatted as shown in section 2.3 above.
 The file’s extension .jpg should be added by Elements when you select the JPEG format in the Format box. If not check your software settings/ preferences.
3.1.3 The image file’s colour profile
In the picture on the left, the line that is highlighted in yellow shows the colour profile that is associated with the file.
The ICC Profile should show sRGB. If it does not, then click on cancel. Then, on the menu bar under Image, go to Convert Color Profile and select Convert to sRGB Profile then start section 3.1.2 of this document again.
Make sure the box next to ICC Profile is ticked then click ‘Save’ and in the next dialogue box (JPEG Options) set Quality to 12 (the maximum) then click on OK to save the file.
3.2 Using Photoshop – Full version
The version used here was Photoshop CC but other versions should work in a similar way.
3.2.1 Re-size the Image Make a copy of your image file and work on the copy so that you do not inadvertently overwrite the original. On the menu bar, click on Image then click on Image Size.
Ensure that the link icon between Width and Height is ticked (it is by default) to maintain the aspect ratio. To the far right of ‘Width’ and ‘Height’ ensure that the word ‘Pixels’ appears. If it does not, then use the dropdown arrow to change it to Pixels.”
Ensure that the Resample box is ticked and in the dropdown box to the right choose ‘Automatic’ as this will choose the correct method of resampling in most cases.
To the right of ‘Width’ enter 1600. The number of pixels in ‘Height’ will then change to maintain the aspect ratio. If this number (Height) exceeds 1600, then enter 1200 into the Height box and the number of pixels in Width will reduce to maintain the aspect ratio.
As a final check, ensure that the number in the Width box does not exceed 1600 and the number in the Height box does not exceed 1200. The number is the Resolution box is of no importance here.
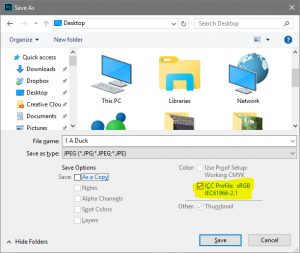
3.2.2 Set the file’s name and extension
On the menu bar under File, click on Save As and you will see the picture below (your icons may be different). The name of the file should be formatted as shown in section 2.3 above.
 The file’s extension of .jpg should be added by Photoshop when you select the JPEG format in the Format box. If not check your software settings/ preferences.
3.2.3 The image file’s colour profile
In the picture on the left, the section that is highlighted in yellow shows the colour profile
associated with the image. The ICC Profile should show sRGB. If it does not, then click on Cancel. On the menu bar under Edit, click on ‘Convert to Profile’. In the dialogue box that pops up select RGB in the Destination Space then choose sRGB as the Profile from the dropdown menu and click on OK. Then start section 3.2.2 of this document again.
Make sure the box next to ICC Profile is ticked then click ‘Save’ and in the next dialogue box (JPEG Options) set Quality to 12 (the maximum) and click on OK to save the file.
3.3 Using Photoshop Lightroom (normally referred to as just Lightroom)
The version used here was Lightroom CC but other versions should work in a similar way
Exporting the image
All of the parameters needed to create your PDI file are set by using Lightroom’s Export command.
Select the photo to be exported then Right-click (Mac is Control-click) on the image and hover over Export then select Export (at the top of the list). The dialogue box shown below should pop up.
 In the Export To: dropdown at the top select Hard Drive and choose where to store your PDI in the Export Location section.
In the File Naming section ensure that the Rename To: box is ticked and select Custom Name from the dropdown. In the Custom Text: box type in the file’s name according to the format shown in section 2.3 above.
In the File Settings section: make sure sRGB is the Colour Space selected from the dropdown (highlighted in yellow); select JPEG from the Image Format dropdown and set Quality: to 100.
In the Image Sizing section click the Resize to Fit box and choose Width & Height from the dropdown. Set W: to 1600 and H: to 1200 and in the box to the right of H: set the dropdown to pixels.
The Resolution can be left alone as it does not affect the image.
We recommend:
- In the Output Sharpening section, tick the Sharpen For: box and Select Screen from the dropdown and Standard for the Amount. Some images may require more or less output sharpening, but the Standard setting usually works well.
- In the Watermarking section (lower down, not shown) ensure the Watermark: box is un-ticked.
User preset – use to save time when creating another PDI.
Above, when all of the parameters are set up correctly, click on the Add button (bottom left) then in the New Preset dialogue box, call it something like BPS PDI comp and click Create. Now all of the settings are saved for use another time. Next time you do this choose the preset ‘BPS PDI comp’ which will be found under your User Presets, put in the correct File Name and Click on Export and your PDI will be created in the correct format.